Open in a new window the already scanned picture: File ? Open (ctrl+o).

2) Create a new layer: Layer ? New ? Layer and start picturing the contours very accurately. Select for the beginning the Brush Tool of Hard Round type and represent the eyes of our figure.

3) Then choose the
Pen Tool and use it for representing the rest of the contours (applying the Stroke Path command).

4) Choose after that the Eraser Tool of small size to make sharp the lines' edges:

5) When finishing the contours, you may delete the layer containing the outlining: Layer ? Delete ? Layer. Create after that a new layer, situated under the contours' layer and paint it in a neutral color, applying the Paint Bucket Tool.

6) Start painting the picture. Firstly we need to paint the whole picture with the basic colors, selecting the Brush Tool. Each color should be inserted on a new layer:

7) Start a more detailed picturing. The eyes will be the first in our list: Choose the Pen Tool with Fill Path command to insert on the picture the pupil of the eye and the iris:

8) a. Then mark out the iris with the Elliptical Marquee Tool and paint it by parts, applying the Gradient Tool, then introduce the shadows, applying the Brush Tool and blur them out, applying the Smudge Tool.


9) Now we'll try to detail the small balls on the girl's hair. Create a new layer above the layer with the basic color and group these layers (don't get outside the contours), applying the combination Layer ? Create Clipping Mask (ctrl+g). Introduce then the shadows, selecting the Burn Tool, changing the instrument's Exposure when processing and then merge down the layers: Layer ? Merge Down (ctrl+e). The shadows must be blurred out with the Smudge Tool.
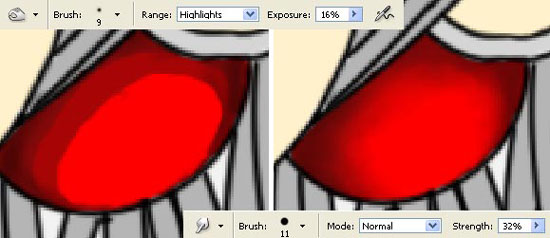
10) Using the Dodge Tool, insert the flares:


13) Insert the shadows on the grouped layer containing the ears (ctrl+g), applying the Brush Tool of Airbrush Pen Opacity Flow type:

14) Combine the grouped layers (ctrl+e) and apply the next command to them: Layer ? Layer Style ? Blending Options with the next adjustments:

15) That is what we get:

16) Add more light on the picture, choosing the Brush Tool:

17) And change a little the color (Ctrl+u).

18) Insert now the shadows on the grouped layer, placed above the basic skin's color (Brush Tool).

19) A little make-up now:

20) Get back to the contours' layer and select the Pen Tool to finish representing the collar. Paint it with the basic color on a new layer situated lower than the previous one:

21) Start painting it on the grouped layer (Brush Tool).

22) Create now one more layer (a grouped one) and represent on it white stripes:

23) Blur them out, applying the next option: Filter ? Blur ? Motion Blur.

24) Change the layer's Blending Mode on Overlay and combine the layers containing the collar's parts:

25) Make smoother the transition of the colors, applying the Smudge Tool and make brighter several places, choosing the Dodge Tool:

27) Smooth out the shadows on the girl's skin, adding the grey color reflexes:

28) Pass to the girl's hair. Select the Gradient Tool on a grouped layer to separate a little the illuminated zone of the hair from that one situated in the shadow:

29) Select the Brush Tool to add the flares on the hair (on a new layer also).

30) Make a copy of the layer, containing the flares and blur out the copy, choosing the next option: Filter ? Blur ? Gaussian Blur.

31) You may make one more copy of this layer just for the blurred zone to be brighter:

32) Make a copy and blur out the layer containing the contours:

33) Minimize the blurred layer's Opacity till 90%.

34) Then create a new layer, above the rest of the layers and insert on it more flares on the girl's pupil of the eye, applying the Brush Tool of Hard Round type of a small size:

35) Make a copy of the flares' layer and blur out this copy too:

36) We have to represent the background now. Make visible firstly the background's layer, clicking on the eye's icon near it in the Layers window and merge down the rest of the layers: Layer ? Merge Visible (shift+ctrl+e). Then make visible again the background's layer and paint it in a different color if that is necessary, applying the Paint Bucket Tool. Next we have to apply the Rectangular Tool to represent the frame for the picture:

37) Make a copy of the girl's layer and make the lowest copy looking entirely white, selecting the next option: Image ? Adjustments ? Channel Mixer.

38) Enlarge a little the layer, selecting the next option: Edit ? Free Transform (ctrl+t) and click on the next buttons: alt+shift.

39) Select the Gradient Tool to illuminate one of the background's corners:

40) Next we have to make a copy of the background's layer and apply to this copy the next filter's option: Filter ? Sketch ? Halftone Pattern.

41) Change the layer's Blending Mode on Overlay:
Check RESULTS:

No comments:
Post a Comment