Saturday, December 11, 2010

Girl with Katana

The next lesson we'll see how is it possible to picture an anime character, to give a certain texture to metal in relief, to woolen clothes and to create in an easy way the background.

1) For the beginning we should open a new file: File - New (ctrl+n)

2)  Choose now the Brush Tool (3-6 px) and try to outline the character to be. I've chosen for this the red color, just to be easier to outline very accurately the contours, which we'll be of black color next.

3)  Change now the size of the Brush Tool in 1 px and select the necessary color for the contours. Open a new layer: Layer - New - Layer and use the Pen Tool to picture very carefully the contours on the new layer.

4)  Erase the layer containing the outlines after that: Layer - Delete Layer. Create a new layer and place it under the layer containing the pictured contours. Paint it in white or grey colors with Paint Bucket Tool. In case that the contours seem to be dimly, you may copy the layer with them: Layer - Duplicate Layer and merge down the layers with contours again: Layer - Merge Down (ctrl+e)

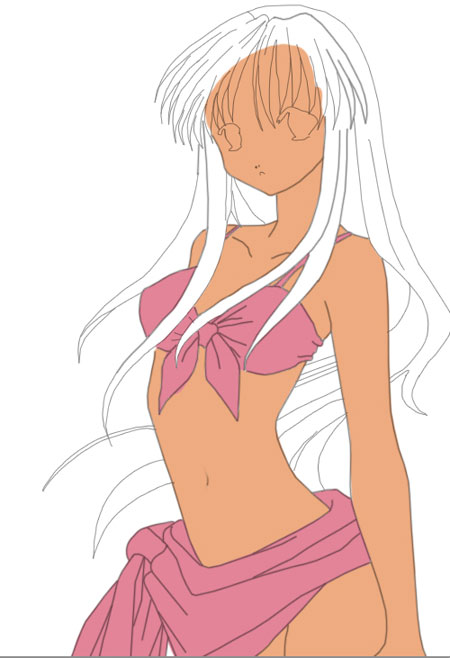
5)  Just not to mix this layer with the rest of them you may entitle it by clicking on the right mouse's button on the layer and choosing Layer Properties. I've decided to turn this picture horizontally, that is why I should select next command: Edit - Transform - Flip Horizontal. Select after that the Brush Tool and on a new layer under the contours' layer color the picture with the main colors:

Anime Beach Girl


Learn how to draw a picture of a girl in the anime style.

The next lesson we’ll try to represent a girl in the Anime style. We need for this operation a graphical plane-table, an example of which is indicated below


1) Open a new file with 1024×768 px.
Select after that a smooth brush and, setting the Opacity on 10%, having approximately the same parameters as in the next picture.
 2) Choose any nuance of blue color it’s appropriate for you:
 3) And represent the background, doing it very smoothly:
 4) Hide the next option Indicates Layer Visibility on the layers’ panel just for the background not to hinder us when drawing different elements:
 5) Represent the girl’s contours on a new transparent layer, applying the Pen Tool.
 6) Select a rough brush on a new layer, situated under the girl’s contours to start drawing some girl’s body’s zones:
 7) You have the body’s color next:
 8) Paint out on a new layer the girl’s clothes:
 9) Select a color of red nuance:
 10) We have to process the hair now:

Anime Blue Girl

1) The next task we'll see how is it possible to make the corrections on the scanned already contours and change their colors, see how to create different textures (textile's for example) applying different filters of the program, different pictures, create also a magic sphere and giving a shining effect to the surfaces.
Open in a new window the scanned contours of the picture we want to process next: File ? Open (ctrl+o).

2) Copy the layer just to make the work possible by moving it on the new layer's icon in the Layers window. The first layer should be erased applying the other button in the same window. Decolorize the layer: Image ? Adjustments ? Desaturate (shift+ctrl+u) and correct the brightness and the contrast of the picture, making use of the next selection: Image ? Adjustments ? Curves (ctrl+m).

3) Make the contours look a little thinner and get to the next window: Layer ? Layer Style ? Blending Options to select the following adjustments:

4) Create now a new layer (use the icon on the Layers window) and place it under this layer, then combine both of them. Accentuate after that the white background in the Select ? Color Range window and click on it:

5) Erase now the marked zone, using the Delete button on the keyboard. Move off the markings: Select ? Deselect (ctrl+d). We have to create a new layer now under the layer with the contours, just not to lose the last layer. Paint it in a neutral color (I choose white color) applying the Paint Bucket Tool. Get back to the layer containing the contours and change their color in the Blending Options window also.

6) Paint the given picture with the basic colors now. I recommend you to place each color on a new layer to make easier after that placing the shadows and if that is possible to change the color easily then. Use the Brush Tool of Hard Round type to make this operation.

Niu Niu Anime Girl

1) In this tutorial we'll see one of the methods to represent a picture in anime style, learn representing accurate contours, change the colors, use different layers and some program's filters.
Open in a new window the already scanned picture: File ? Open (ctrl+o).


2) Create a new layer: Layer ? New ? Layer and start picturing the contours very accurately. Select for the beginning the Brush Tool of Hard Round type and represent the eyes of our figure.


3) Then choose the      
Pen Tool and use it for representing the rest of the contours (applying the Stroke Path command).

4) Choose after that the Eraser Tool of small size to make sharp the lines' edges:

5) When finishing the contours, you may delete the layer containing the outlining: Layer ? Delete ? Layer. Create after that a new layer, situated under the contours' layer and paint it in a neutral color, applying the Paint Bucket Tool.

6) Start painting the picture. Firstly we need to paint the whole picture with the basic colors, selecting the Brush Tool. Each color should be inserted on a new layer:

7) Start a more detailed picturing. The eyes will be the first in our list: Choose the Pen Tool with Fill Path command to insert on the picture the pupil of the eye and the iris:

8) a. Then mark out the iris with the Elliptical Marquee Tool and paint it by parts, applying the Gradient Tool, then introduce the shadows, applying the Brush Tool and blur them out, applying the Smudge Tool.
b. Introduce a small flare also in the middle of the iris:

Friday, December 10, 2010

Simple Anime Girl Picture

1) This new topic we'll learn to picture a girl's head, anime style by imitating somehow the vectoring image.
Open in a new window the scanned draft: File - Open (ctrl+o)

2)  Make the draft look more in contrast, selecting Image - Adjustments - Curves (ctrl+m).

3) Just to make more convenient the picturing of accurate contours, we have to change the color of the draft, using the next command: Image - Adjustments - Channel Mixer. Select red color, for example.

4) Create a new layer now: Layer - New - Layer and choose the Pen Tool to represent the eyes' contours, the contours of the eyebrows and the face's ones, applying Fill Path option.

5)  Represent after that the hair, selecting Stroke Path option, but preliminary choose on the Brush Tool's panel the necessary brush's thickness:

6)  Erase now the layer containing the draft, moving it on the recycle bin's icon in the Layers window:

7)  Create a new layer and place it under the layer with the contours. Select after that the Brush Tool of the necessary size and paint the girl's image with the main colors. We have to place each new color on a new layer, to make the work easier:

8)  Using the Pen Tool, we may represent the iris of the eye with the necessary shape:

9)  Start coloring it. Choose for this the Brush Tool. At the beginning we must separate the lightest zone, then blur out the bounds with the Blur Tool. We have to add also more dark color, minimizing the brush's Hardness on 0%.

Girl with Cat

1) Learn how to picture a funny cartoon illustration and also we'll see how is it possible to clear out the already scanned contours.
Open in a new window the already scanned contours of the picture you have: File - Open (ctrl+o).

2) Make a copy of this layer to make possible working with it: Layer - Duplicate - Layer (ctrl+j). The previous layer must be erased, using the corresponding icon in the Layers window. Decolorize after that the layer: Image - Adjustments - Desaturate (shift+ctrl+u) and make it a little lighter, selecting the next options: Image - Adjustments - Curves (ctrl+m).

3) Make the necessary number of copies of the previous layer (ctrl+j), changing the Blending Mode of the layer on Overlay:

4) We've got the desired result: black contours and a white background. Now we have to merge down the layers: Layer - Merge Visible (shift+ctrl+e). We need to take now the Brush Tool of white color (used for erasing operation) and of black color (for the stripes) to correct the picture we have:

5) Mark out now the white background, entering in the menu Select - Color Range and click on the background with the pipette it is shown there:

6) Delete it, selecting the necessary button on the keyboard. Change now the layer's Blending Mode on Multiply:

7) We have to create a new layer, for an appropriate painting: Layer - New - Layer. The new layer should be placed lower than the contours' layer and paint it in a neutral color, selecting the Paint Bucket Tool.

8)  We have to color now the picture with the basic colors, selecting the Brush Tool of Hard Round type. To make the work easier, it's necessary to place each of the new colors on a new layer (under the contours' layer, of course).